


Article by Dominik Kuzmitskij, Developer at ACBaltica.
In this article we will talk about a tool that helps to test the knowledge of employees. Often many companies are facing necessity for evaluation and checks of their employees’ knowledge. For this purpose, we have developed a special tool, that can help with testing knowledge of your employees, certificating and finding the best results.
Let’s check the program interface (Figure 1). This tool consists of the following areas:
-
Test searching area;
-
Test area in the system;
- Results area of the chosen test.
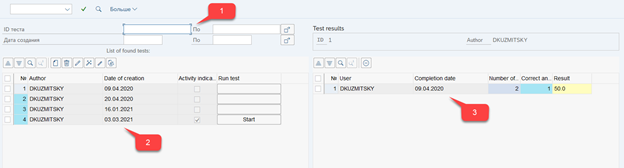
Figure 1. The main screen
The test searching area allows you to fetch tests by their ID and creation date. By clicking the "Search" button, all found tests will be displayed in the second area. To check the results, you need to double-click on the test. The test results are displayed in the third area.
Let's check the functionality of the tool. We can find the following buttons in the second area (Figure 2):
-
Create;
-
Delete;
-
Edit;
-
Activate;
-
Deactivate;
-
Add author.

Figure 2. Test area.
Test creation
In order to create a test, you need to click the "Create" button. Afterwards we get to the test creation screen. It consists of two areas (Figure 3):
-
Question creation area;
-
Answers creation area;
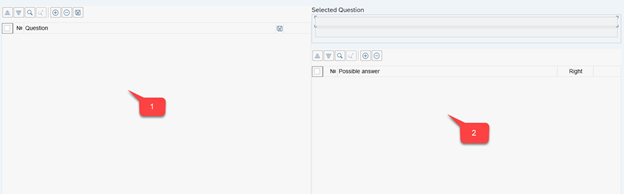
Figure 3. Test creation screen
In order to create a question, click the "Create question" button in the first area and enter the respective text (Figure 4):
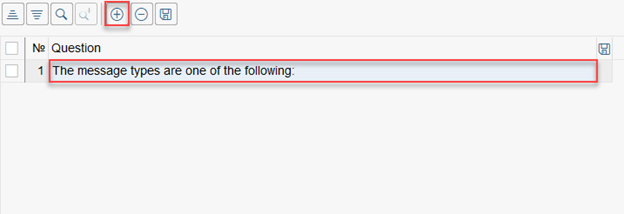
Figure 4. Question creation area
In order to create answers to a question click the "Create an answer" button in the second area. Let's create four options as an example. In the “Correct” column, we indicate that the fourth answer is correct (Figure 5).
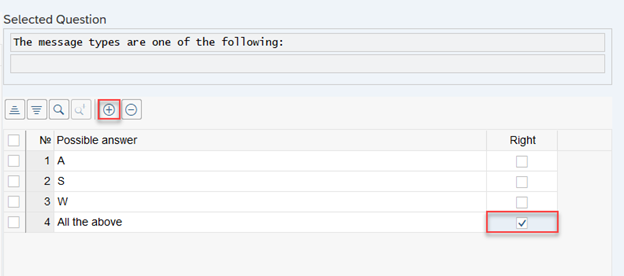
Figure 5. Answer creation area
After creating a question, we need to save it. To save the question click on the "Save" button in the question creation area. After saving the question, an indicator will appear in the second column (Figure 6).
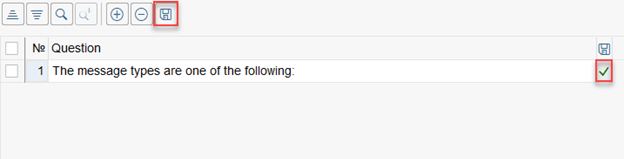
Figure 6. Saving a question
Let's create another question as an example. Click on the "Create" button and enter the text of the question (Figure 7).
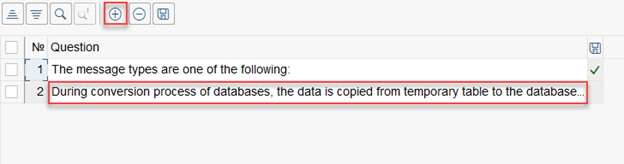
Figure 7. Creating a second question
Let’s create four options and indicate the correct answer in the answer area (Figure 8).
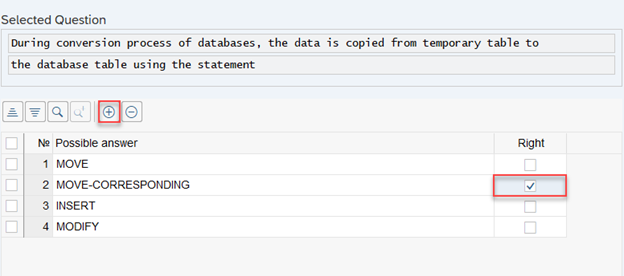
Figure 8. Creating answers to the second question
Click on the "Save" button in the question creating area, to save the second question. In the second column, we will have a save indicator (Figure 9).
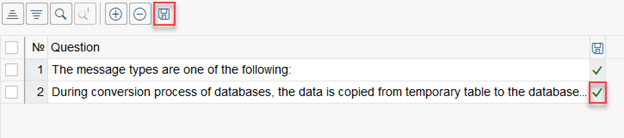
Figure 9. Saving the second question
Thus, we have created an ABAP test that includes two questions. (Figure 10).
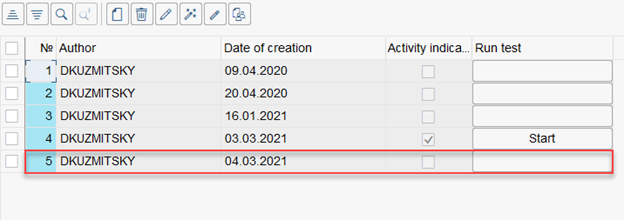
Figure 10. Created test
We can edit created test, add new questions and answer options to it. This test can also be deleted, activated or deactivated. Our test is currently not activated and employees cannot take it.
Test activation
In order to make the test available, we must activate it. To activate a test, you must select it and click on the “Activate” button (Figure 11).

Figure 11. Test activation
Passing the test
After activating the test, employees can take it. In order to start the test, you need to click the "Start" button. Employees will be taken to the test passage screen that consists of two areas (Figure 12):
-
Question area;
-
Answer area.
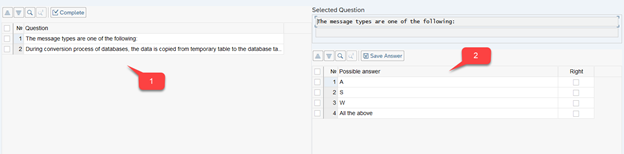
Figure 12. Test Passing Screen
In order to select a question, you need to double-click the question. Answer options will appear in the second area. Let's choose the correct answer “All the above”. Click on the "Save answer" button. If the given answer was correct, then all options will become green (Figure 13).
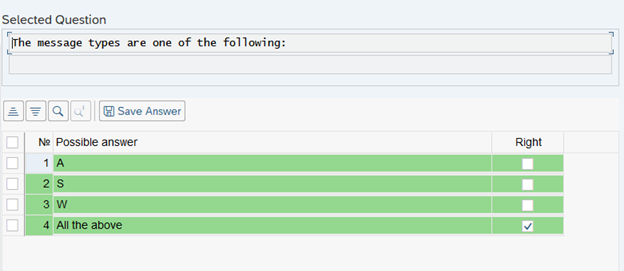
Figure 12. Correct Result for the first question
Let's choose the second question and indicate the first option (incorrect). By clicking the “Save answer” button, we will get the following result (Figure 13).
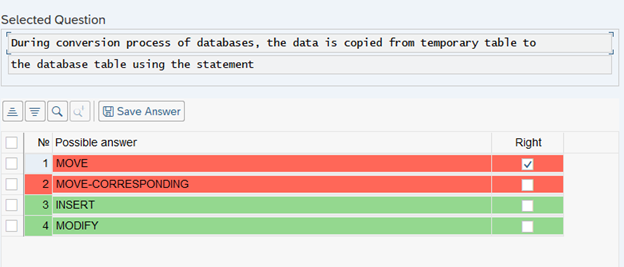
Figure 13. Incorrect Result
As we can see, the first and second answers are colored in red, because the right option is two and we answered one. Thus, we answered the first question correctly, and the second incorrectly. Now we need to click the “Finish” button to finish the test and get the result (Figure 14).
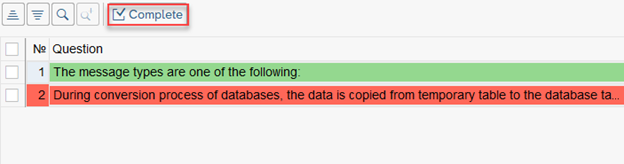
Figure 14. Completing the test
We receive a message that we have passed the test by 50% (only one correct answer out of two).
In order to see the results on the main screen, you need to double-click the test. Our result will be displayed in the result area (Figure 15).
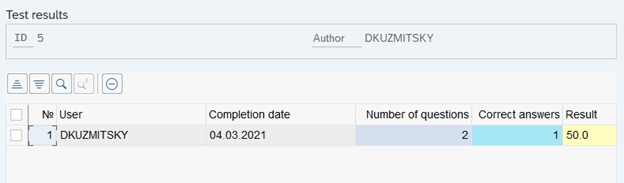
Figure 15. The main screen of the program. Test result
Thus, with the help of this tool, we can conduct the planned employee knowledge check, carry out certification and select suitable employees with mandatory knowledge for certain project.
Conclusion:
This tool allows you to test the knowledge of employees and make certification effortlessly. All test results are stored in the system for further analysis and selection of employees based on their competencies and knowledge. Thanks to the flexibility of the tool, you can easily create new tests, as well as edit existing ones by adding new questions or updating them with more recent information. It has simple and clear interface that allows to take tests conveniently.
Subscribe